Widget - GridLayout
GridLayout 위젯은 출력 창에 그려지는 Children 위젯의 크기와 위치를 제어할 수 있는 위젯으로 Layout에 속한다.
GridLayout 위젯은 GridLayout 위젯에 속하는 Children 위젯을 격자형으로 배치하고자 할 때 사용할 수 있다.
아래의 <코드 1>은 7개의 Button 위젯을 3열의 GridLayout 위젯에 배치하는 예이다. 열의 개수는 GridLayout 위젯의 cols 프라퍼티로 설정한다.
<코드 1>
import kivy
kivy.require('2.0.0')

from kivy.app import App
from kivy.uix.gridlayout import GridLayout
from kivy.uix.button import Button

class MyRootWidget(GridLayout):
    def __init__(self, **kwargs):
        GridLayout.__init__(self, **kwargs)
        self.cols = 3
        for i in range(1, 8):
            self.add_widget(Button(text=f'Button {i}'))

class MyApp(App):
    def build(self):
        self.title = 'My App'
        return MyRootWidget()

if __name__ == '__main__':
    MyApp().run()

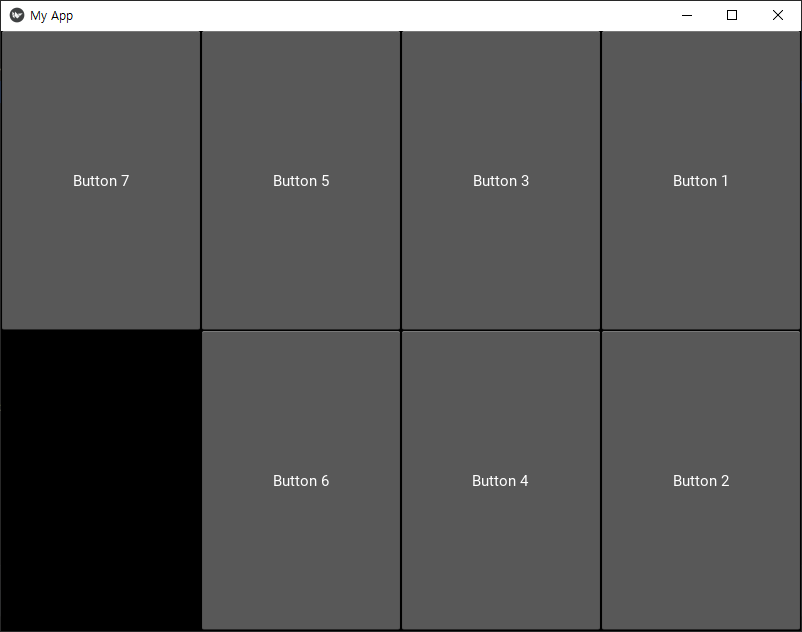
GridLayout 위젯의 rows 프라퍼티를 이용해 행의 개수를 기준으로 Children 위젯을 배치할 수 있다.
아래의 <코드 2>는 GridLayout 위젯의 rows 프라퍼티를 사용한 예이다.
<코드 2>
import kivy
kivy.require('2.0.0')

from kivy.app import App
from kivy.uix.gridlayout import GridLayout
from kivy.uix.button import Button

class MyRootWidget(GridLayout):
    def __init__(self, **kwargs):
        GridLayout.__init__(self, **kwargs)
        self.rows = 2
        for i in range(1, 8):
            self.add_widget(Button(text=f'Button {i}'))

class MyApp(App):
    def build(self):
        self.title = 'My App'
        return MyRootWidget()

if __name__ == '__main__':
    MyApp().run()
위의 <코드 2>를 실행하면 2개의 행을 기준으로 7개의 Button 위젯이 GridLayout 위젯에 배치된다.

GridLayout 위젯의 orientation 프라퍼티를 사용하면 Children 위젯이 배치되는 순서를 설정할 수 있다.
options 인자에서 l은 left, r은 right, t는 top, b는 bottom을 의미한다.
orientation = OptionProperty('lr-tb', options=(
    'lr-tb', 'tb-lr', 'rl-tb', 'tb-rl', 'lr-bt', 'bt-lr', 'rl-bt', 'bt-rl'))
위의 <코드 2>에서 self.rows = 2 문장 아래에 다음의 코드를 추가한 후 실행하면 GridLayout 위젯에 배치되는 Button의 순서가 변경된 것을 확인할 수 있다.
self.rows = 2
self.orientation = 'tb-rl'
'tb-rl'은 위젯을 위에서 아래로, 오른쪽에서 왼쪽으로 배치하겠다는 의미이다.
위의 <코드 1>에서 self.cols = 3 문장 아래에 다음의 코드를 추가한 후 실행하면 GridLayout 위젯 내에 배치되는 Button 위젯의 왼쪽, 위, 오른쪽, 아래의 간격이 달라진 것을 확인할 수 있다.
self.cols = 3
self.padding = [10, 20, 30, 40]

GridLayout 위젯의 padding 프라퍼티에 대한 설명은 다음과 같다.
    Padding between the layout box and its children:
        [padding_left, padding_top, padding_right, padding_bottom]

    padding also accepts:
        a two argument form [padding_horizontal, padding_vertical]
        and a one argument form [padding]
GridLayout 위젯의 spacing 프라퍼티는 GridLayout에 배치되는 Children 위젯들 간의 간격을 조절하기 위해 사용할 수 있다.
위의 <코드 1>에서 self.cols = 3 문장 아래에 다음의 코드를 추가한 후 실행하면 GridLayout 위젯 내에 배치되는 Button 위젯 간의 간격이 달라진 것을 확인할 수 있다.
self.cols = 3
self.spacing = [15, 5]

GridLayout 위젯의 spacing 프라퍼티에 대한 설명은 다음과 같다.
Spacing between children:
    [spacing_horizontal, spacing_vertical]

spacing also accepts:
    a one argument form [spacing]
아래의 <코드 3>은 다섯번째로 추가되는 Button 위젯의 size_hint 프라퍼티의 값을 [None, None]으로 설정하고 Button의 width 프라퍼티의 값을 200으로 설정한 예이다.
<코드 3>
import kivy
kivy.require('2.0.0')

from kivy.app import App
from kivy.uix.gridlayout import GridLayout
from kivy.uix.button import Button

class MyRootWidget(GridLayout):
    def __init__(self, **kwargs):
        GridLayout.__init__(self, **kwargs)
        self.cols = 3
        self.spacing = [15, 5]
        btn5 = Button(text=f'Button {5}', size_hint=[None, None], width=200)
        for i in range(1, 8):
            if i != 5:
                self.add_widget(Button(text=f'Button {i}'))
            else:
                self.add_widget(btn5)

class MyApp(App):
    def build(self):
        self.title = 'My App'
        return MyRootWidget()

if __name__ == '__main__':
    MyApp().run()
GridLayout 위젯에서 다른 Button은 상대적인 크기를 가지나, 다섯번째 Button은 절대적인 크기를 갖는다.
Button 클래스에서 절대적인 크기를 나타내는 width 및 height 프라퍼티의 기본 설정값은 100이다.

'코딩 > 파이썬 kivy' 카테고리의 다른 글
| kivy 스터디 017. Widget - BoxLayout (0) | 2021.08.26 |
|---|---|
| kivy 스터디 016. Kivy에서의 Widget (위젯) (0) | 2021.08.22 |
| kivy 스터디 015. Kivy Input Management - on_touch_move() (0) | 2021.08.10 |
| kivy 스터디 014. Kivy Input Management - on_touch_up() (0) | 2021.08.08 |
| kivy 스터디 013. Kivy Input Management - on_touch_down() (0) | 2021.08.07 |


