셀 서식(스타일) 설정
Cell 클래스가 제공하는 기본적인 속성의 예는 아래와 같다.
- column
- column_letter
- row
- coordinate
- value
아래의 <코드 1>은 Cell 클래스가 제공하는 몇 가지 기본적인 속성을 사용한 예이다.
<코드 1>
# openpyxl 3.0.7
from openpyxl import load_workbook
wb = load_workbook('sample.xlsx')
ws = wb.active
cell = ws['A1']
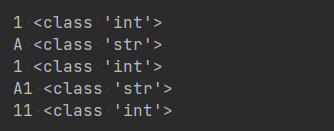
print(cell.column, type(cell.column))
print(cell.column_letter, type(cell.column_letter))
print(cell.row, type(cell.row))
print(cell.coordinate, type(cell.coordinate))
print(cell.value, type(cell.value))
sample.xlsx 엑셀 파일의 데이터가 아래와 같을 때,

<코드 1>의 실행 결과는 다음과 같다.
Cell 클래스는 StyleableObject 클래스를 상속하며,
class Cell(StyleableObject):
StyleableObject 클래스에는 셀 서식(스타일) 관련 다양한 속성이 정의되어 있다.
class StyleableObject(object):
    """
    Base class for styleble objects implementing proxy and lookup functions
    """

    font = StyleDescriptor('_fonts', "fontId")
    fill = StyleDescriptor('_fills', "fillId")
    border = StyleDescriptor('_borders', "borderId")
    number_format = NumberFormatDescriptor()
    protection = StyleDescriptor('_protections', "protectionId")
    alignment = StyleDescriptor('_alignments', "alignmentId")
    style = NamedStyleDescriptor()
    quotePrefix = StyleArrayDescriptor('quotePrefix')
    pivotButton = StyleArrayDescriptor('pivotButton')
PatternFill
PatternFill 클래스를 이용해 셀의 색상을 설정할 수 있다.
아래의 <코드 2>는 PatternFill 클래스를 이용해 셀 A1의 색상을 노랑색으로 설정하는 예이다.
<코드 2>
# openpyxl 3.0.7

from openpyxl import Workbook
from openpyxl.styles import PatternFill

wb = Workbook()
ws = wb.active

ws['A1'] = 'Hello'
ws['A1'].fill = PatternFill(patternType='solid', fgColor='FFFF00')

wb.save('sample.xlsx')

아래는 PatternFill 클래스의 patternType 속성에 대한 설명이다.
Value must be one of {
‘darkUp’, ‘lightTrellis’, ‘darkHorizontal’, ‘darkGray’, ‘lightHorizontal’,
‘darkGrid’, ‘lightUp’, ‘darkDown’, ‘darkTrellis’, ‘lightGrid’, ‘lightGray’,
‘lightVertical’, ‘gray125’, ‘gray0625’, ‘mediumGray’, ‘lightDown’,
‘darkVertical’, ‘solid’}
Side & Border
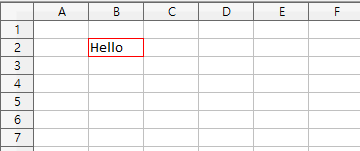
Side와 Border 클래스를 이용해 셀의 테두리를 설정할 수 있다.
아래의 <코드 3>은 Side 및 Border 클래스를 이용해 셀 B2의 테두리를 빨강색으로 설정하는 예이다.
<코드 3>
# openpyxl 3.0.7

from openpyxl import Workbook
from openpyxl.styles import Side, Border

wb = Workbook()
ws = wb.active

ws['B2'] = 'Hello'
side = Side(style='thin', color='FF0000')
ws['B2'].border = Border(left=side, right=side, top=side, bottom=side)

wb.save('sample.xlsx')
아래는 Side 클래스의 style 속성에 대한 설명이다.
Value must be one of {
‘hair’, ‘dashDotDot’, ‘dashDot’, ‘thin’, ‘mediumDashed’, ‘slantDashDot’,
‘dotted’, ‘dashed’, ‘medium’, ‘thick’, ‘mediumDashDot’, ‘double’,
‘mediumDashDotDot’}
Alignment
Alignment 클래스를 이용해 셀 데이터를 정렬할 수 있다.
아래의 <코드 4>는 Alignment 클래스를 이용해 셀 A1-B4의 데이터를 왼쪽, 오른쪽, 가운데 등 다양한 방식으로 정렬하는 예이다.
<코드 4>
# openpyxl 3.0.7

from openpyxl import Workbook
from openpyxl.styles import Alignment

wb = Workbook()
ws = wb.active

for i in range(1, 5):
    ws.cell(i, 1, value='Hello')
    ws.cell(i, 2, value='openpyxl!')

ws.cell(1, 1).alignment = Alignment(horizontal='left')
ws.cell(1, 2).alignment = Alignment(vertical='top')

ws.cell(2, 1).alignment = Alignment(horizontal='center')
ws.cell(2, 2).alignment = Alignment(vertical='center')

ws.cell(3, 1).alignment = Alignment(horizontal='right')
ws.cell(3, 2).alignment = Alignment(vertical='bottom')

ws.cell(4, 1).alignment = Alignment(textRotation=45)
ws.cell(4, 2).alignment = Alignment(textRotation=90)

wb.save('sample.xlsx')

Color
Color 클래스를 사용함에 있어 아래의 <코드 5>에서처럼 RGB 값이 아닌 indexed 속성을 사용할 수도 있다.
<코드 5>
# openpyxl 3.0.7

from openpyxl import Workbook
from openpyxl.styles import PatternFill, Color

wb = Workbook()
ws = wb.active

for i in range(64):
    ws.cell(i+1, 1, value=i)
    ws.cell(i+1, 2).fill = PatternFill(patternType='solid', fgColor=Color(indexed=i))

wb.save('sample.xlsx')


'코딩 > 파이썬과 엑셀' 카테고리의 다른 글
| openpyxl로 엑셀 다루기 025. 시트 관련 유용한 속성 (0) | 2021.08.18 |
|---|---|
| openpyxl로 엑셀 다루기 024. 열 또는 행 추가, 삭제 - insert_cols, insert_rows (0) | 2021.08.16 |
| openpyxl로 엑셀 다루기 023. 셀 서식(스타일) 설정 - 폰트(글꼴) (0) | 2021.08.06 |
| openpyxl로 엑셀 다루기 022. column_dimensions와 row_dimensions로 그룹 설정 (0) | 2021.08.05 |
| openpyxl로 엑셀 다루기 021. add_image 메서드로 셀에 그림 파일 넣기 (0) | 2021.07.27 |


